I’ve been programming for a long time and I can’t say I have had much exposure in becoming a ColdFusion developer if any at all. In fact, I have wondered, “is ColdFusion dead?”. Turns out ColdFusion may not have the largest footprint in the web development world but rest assured, it’s still here and Adobe is still investing in its platform with the most recent ColdFusion 12 (aka ColdFusion 2016) release.
According to Web Technology Surveys (W3Techs), ColdFusion is the least popular web development platform; even behind static files. However, its rated second behind Java for highest traffic sites. That’s right, more than ASP.NET and PHP. My first thought might be Government and large corporations represent the majority of the Adobe ColdFusion community.
In regards to ColdFusion jobs I found 491 jobs doing a search in all the United States. That seems quite low considering Java, .NET, ASP.NET and PHP had 1000+. Doing a quick search on Indeed for Denver, CO I found a total of 23 results for ColdFusion meanwhile PHP was 474, Java was 1,612 and ASP.NET was 234.
The takeaway from these few “non-scientific” statistics would be ColdFusion is actively used but only with a small market share. Is that a big deal or mean ColdFusion is going away? I’d say not.
Today I’m a ColdFusion Developer
About a month ago, my largest client asked me if I could build a couple new ColdFusion sites. I knew they had ColdFusion as part of their infrastructure but didn’t know they were actively doing new ColdFusion programming. So, as you can tell from this post I didn’t turn down the opportunity to help these great people.
I know some amazing developers who can run circles around me. Really, they are awesome but one thing I learned early in my career is to not be afraid of learning something new. More importantly confident enough to learn on demand. As a developer it’s my biggest fear to get left behind and technology to evolve faster than my skills. This even includes learning a platform that has low demand.
The skill I’m refining here isn’t to learn ColdFusion but rather refining my ability to learn.
This particular project includes the addition of two new sites where the first is RESTful services to expose operational data and the second an interactive site to consume and document these new services.
Getting Started with ColdFusion
When starting anything new the first step is to take inventory of what we have and what we know. For me, I knew to get started with ColdFusion development I needed these items:
- Apache 2.2 (Visual C++ 10)
- ColdFusion 10
Then, to become a ColdFusion Developer, I needed a crash course on ColdFusion and found a really nice site called Learn ColdFusion in a Week. There you’ll find a ColdFusion tutorial for just about every needed to get started. The idea with anything technical is to learn what you don’t know then the remainder of what you learn is dictated by On Demand Learning. If I focused on learning ColdFusion end-to-end it will be too much information considering my deadline doesn’t account for learning a new language.
The next step was to spin up a VM and start downloading. I chose Windows 7 as my VM since I already had a pristine copy installed. However, I did learn the right recipe of versions was important.
- ColdFusion 9 or ColdFusion 10 with update 13 or less requires Apache 2.2
- ColdFusion 10 with update 14 or higher, ColdFusion 11 or ColdFusion 12 requires Apache 2.4
Naturally when designing something new I’ll start thinking in terms of design patterns and immediately I went straight to the MVC design pattern. The number one reason for using a pattern like MVC is Separation of Concern and the ability to incrementally test each with Unit Tests.
After a bit of research (nice reference) I narrowed my choices to FuseBox and ColdBox. FuseBox was referenced by Adobe in their documentation but Coldbox seemed to have more available documentation, tutorials and active user base. So it seemed logical to use Coldbox.
Lastly, was the IDE I could use. Unfortunately, I was restricted to Eclipse + CFEclipse by the client. I haven’t dabbled in either yet but you could use CF Builder or its predecessor CF Studio.
Downloading the Required Tools
Like every programmer the ColdFusion Developer has their tool set. Here I’ve summarized what I found to be the basis for getting started.
Note: I had better luck using 32-bit installations but at a minimum choose 32-bit or 64-bit and use that for all installed applications mentioned.
Download ColdFusion
Note: Check out the ColdFusion repository created and maintained by Gavin Pickin. It’s there you can download just about every release of ColdFusion.
- Download ColdFusion 9 (v9.0.2) (Docs)
- Download ColdFusion 10 (v10) (Docs)
- Download ColdFusion 11 (v11) (Docs)
- Download ColdFusion 12 (v12-2016) (Adobe Documentation)
- Download CF Builder 3 (v3)
- Download CF Builder 2016 (v2016)
- Download CF Studio (v3.1) (v4) (v4.5.1)
Apache for Windows
Note: I’m using Apache for Windows since I can quickly spin up a development environment using it. Much of the configurations should be transferable to a Linux environment like Ubuntu or Fedora Core.
- Download Apache 2.2 (32-bit, VC10) (64-bit, VC10)
- Download Apache 2.4 (32-bit, 64-bit, VC14) (32-bit, 64-bit, VC11) (32-bit, 64-bit, VC10)
Java
- Download Java 1.7 (v7u79, v7u80)
- Download Java 1.8 (v8u101, v8u102)
Eclipse
Note: I’m using the PHP package but either Java or PHP will do. Java might be more applicable for ColdFusion developers.
- Download Eclipse (for Java Developers, for PHP Developers, etc.)
CFEclipse
Note: Installed via Eclipse
- Download CFEclipse (how-to)
ColdBox
Note: Managed by CommandBox CLI (Command Line Interface)
- Download CommandBox CLI (v3.2.0)
Installing ColdFusion
Install Apache 2.2 for Windows
Note: Helpful video
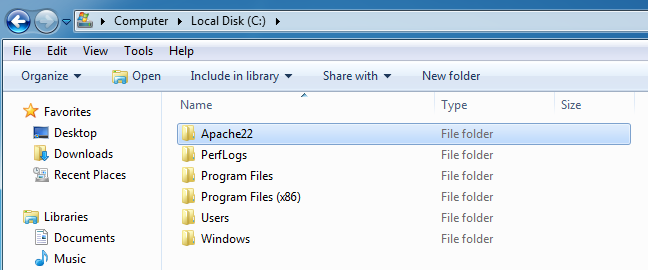
- Extract Apache folder to c:\Apache[VersionNum]\ (this must match ~/conf/httpd.conf ServerRoot value)
- Edit ~/conf/httpd.conf
In short, there are two ways to host a site in a development environment.
Options 1: Virtual Directory on Specified Port
Example: http://localhost:8080/- Uncomment “LoadModule rewrite_module modules/mod_rewrite.so” to use .htaccess url redirects.
- Create ColdFusion directory. Ensure ‘AllowOverride’ is set to All if you’re wanting to use .htaccess for url redirects.
Example:<Directory "/localhost-www/CFSite"> Options Indexes FollowSymLinks AllowOverride All Order allow,deny Allow from all </Directory>
- Uncomment “Include conf/extra/httpd-vhosts.conf” to add virtual hosts
Example Virtual Host:<VirtualHost localhost:8080> DocumentRoot "/localhost-www/CFSite" ErrorLog "logs/error.log" CustomLog "logs/access.log" common </VirtualHost>
Note: Add Listen 8080 to httpd.conf
Options 2: Virtual Directory as Subfolder
Example: http://localhost/CFSite/- Uncomment “LoadModule rewrite_module modules/mod_rewrite.so” to use .htaccess url redirects.
- Create ColdFusion directory. Ensure ‘AllowOverride’ is set to All if you’re wanting to use .htaccess for url redirects.
Example:<Directory "/localhost-www/CFSite"> Options None AllowOverride All Order allow,deny Allow from all </Directory>
- Add directory Alias
Example Folder Alias:<IfModule alias_module> Alias /CFSite /localhost-www/CFSite </IfModule>
- From cmd window as admin, run ‘~/bin/httpd -t’ to test httpd.conf file
- From cmd window as admin, run ‘~/bin/httpd -k install’ to install httpd as a service
- Run ~/bin/ApacheMonitor.exe (place shortcut in start menu startup folder to load when logged in)
Install ColdFusion 10
Important: Before continuing ensure the Apache web server is running.
- Execute the ColdFusion installation file
- Click Next on Introduction
- Accept and click Next on License Agreement
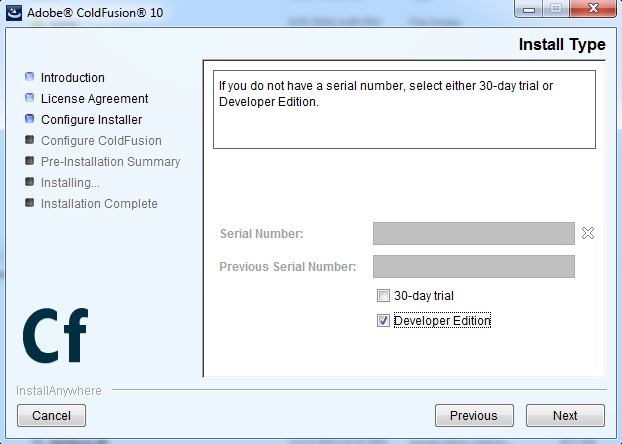
- Choose Developer Edition and click Next on Configure Installer > Install Type
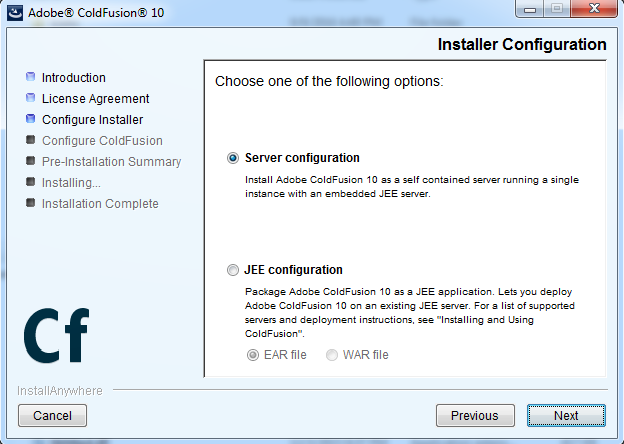
- Select Server configuration and click Next on Configure Installer
- Check all ColdFusion subcomponents and click Next on Configure Installer > Subcomponent Installation
- Do not check Enable Secure Profile and click Next on Configure Installer > Secure Profile
- Add a password for the remote start/stop administration and click Next on the Configure Installer > Remote Component Administration Credentials
- Leave the default installation directory and click Next on Configure Installer > Select Installation Directory
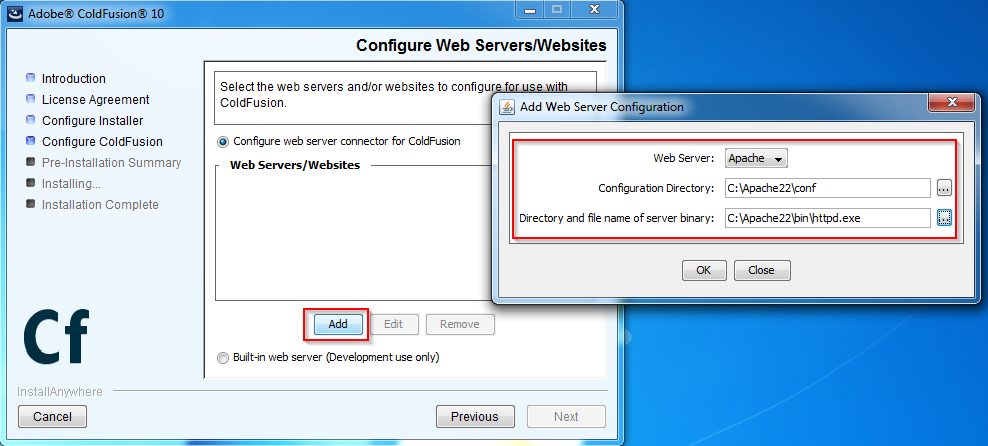
- Click Add and add Apache server previously installed then click Next on Configure ColdFusion > Configure Web Server/Websites
- Enter the Administrator password and click Next on the Configure ColdFusion > Administrator Password
- Check Enable RDS and add a password then click Next on Configure ColdFusion > Enable RDS
- Leave the default for Automatically check for server updates and click Next on Configure ColdFusion > Server Updates
- Click Install on Pre-Installation Summary
- During the installation when prompted click Allow access to create the firewall rules to allow remote access for the Java
- Leave checked Launch the Configuration Wizard in the default browser and click Done on Installation Complete
- At the ColdFusion Administrator web page enter the password created during the setup
- Click OK when the Setup is Complete
- Now you’ll be at the ColdFusion Administrators web page. The first item you might configure would be the Data Sources.

- To test the installation create a Hello World html file with a .cfm extension; it should be displayed

The installation process not only installs the ColdFusion interpreter but creates a backup of the httpd.conf and appends Include “C:\Apache22\conf\mod_jk.conf”
Install ColdBox
Note: Great tutorial on CommandBox CLI site but no need to use the integrated server.
If you need help with commands be sure to explore the command name followed by help (e.g. coldbox help or coldbox create help, etc.).
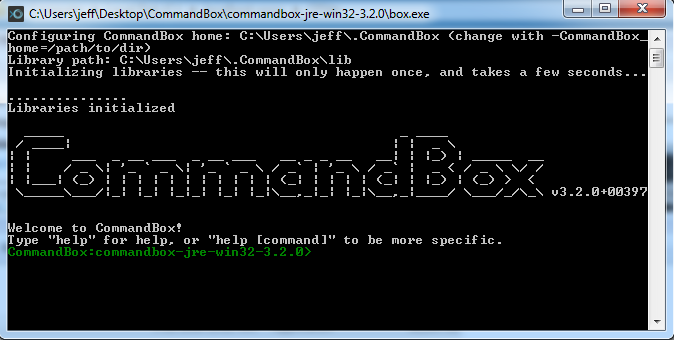
- Extra the CommandBox zip file containing the jre (e.g. commandbox-jre-win32-3.2.0.zip) and execute box.exe. It will initially load the JRE library the first time it is ran.
- Navigate to c:\localhost-www\cfsite\ folder: > cd c:/localhost-www/CFSite/
Any action executed will result in output to this site folder. - Create new ColdBox site: > coldbox create app CFSite
This will create all the necessary scaffolding in the CFSite folder.
Now we need to configure Apache to handle ColdBox URL routes.
At the root of our site at C:\localhost-www\CFSite we want to create an .htaccess file with the following text…
---------- .htaccess at CF site root --------------
RewriteEngine on

# Bypass call related to adminstrators or non rewrite folders, you can add more here.
RewriteCond %{REQUEST_URI} ^/(.*(CFIDE|cfide|CFFormGateway|jrunscripts|railo-context|mapping-tag|fckeditor)).*$
RewriteRule ^(.*)$ - [NC,L]

# Bypass flash / flex communication
RewriteCond %{REQUEST_URI} ^/(.*(flashservices|flex2gateway|flex-remoting)).*$
RewriteRule ^(.*)$ - [NC,L]

# Bypass images, css, javascript and docs, add your own extensions if needed.
RewriteCond %{REQUEST_URI} \.(bmp|gif|jpe?g|png|css|js|txt|pdf|doc|xls|ico)$
RewriteRule ^(.*)$ - [NC,L]

# The ColdBox index.cfm/{path_info} rules.
RewriteRule ^$ index.cfm [QSA,NS]
RewriteCond %{REQUEST_FILENAME} !-f
RewriteCond %{REQUEST_FILENAME} !-d
RewriteRule ^(.*)$ index.cfm/%{REQUEST_URI} [QSA,L,NS]
It’s important the Apache Directory listing mentioned previously has AllowOverride set to All. Another option is to set the base directory in the httpd.conf file.
<Directory "/localhost-www/CFSite">
	Options FollowSymLinks
	AllowOverride All
	Order deny,allow
	Deny from all
</Directory>
If you recall, we had two installation options in Apache of either accessing the site at the root of a URL (e.g. http://localhost:8080) or as a subfolder of the URL (e.g. http://localhost:8080/CFSite). If you chose the first approach you can stop here. However if you chose the second as a subfolder there are two more required steps in configuring Coldbox.
Configure CFSite/Application.cfc
We need to add a mappings that tells ColdBox how to references specific folders. You’ll hear these referred as “this.mappings” in the “Application file”.
As seen below I added the this.mappings array with a path to our application coldbox folder. Since we are operating as a subfolder the relative path to the coldbox files are not at the expected /coldbox path but rather at C:/localhost-www/CFSite/coldbox.
/**
* Copyright 2005-2007 ColdBox Framework by Luis Majano and Ortus Solutions, Corp
* www.ortussolutions.com
* ---
*/
component{
	// Application properties
	this.name = hash( getCurrentTemplatePath() );
	this.sessionManagement = true;
	this.sessionTimeout = createTimeSpan(0,0,30,0);
	this.setClientCookies = true;
	this.mappings = {
		"/coldbox" = "C:/localhost-www/CFSite/coldbox"
	};

	// COLDBOX STATIC PROPERTY, DO NOT CHANGE UNLESS THIS IS NOT THE ROOT OF YOUR COLDBOX APP
	COLDBOX_APP_ROOT_PATH = getDirectoryFromPath( getCurrentTemplatePath() );
	// COLDBOX_APP_ROOT_PATH = "/localhost/CFSite"; // If were set manually
	// The web server mapping to this application. Used for remote purposes or static purposes
	COLDBOX_APP_MAPPING   = "";
	// COLDBOX_APP_MAPPING   = "/CFSite"; // If were set manually
	// COLDBOX PROPERTIES
	COLDBOX_CONFIG_FILE 	 = "";
	// COLDBOX APPLICATION KEY OVERRIDE
	COLDBOX_APP_KEY 		 = "";

	// application start
	public boolean function onApplicationStart(){
		application.cbBootstrap = new coldbox.system.Bootstrap( COLDBOX_CONFIG_FILE, COLDBOX_APP_ROOT_PATH, COLDBOX_APP_KEY, COLDBOX_APP_MAPPING );
		application.cbBootstrap.loadColdbox();
		return true;
	}

	// application end
	public void function onApplicationEnd( struct appScope ){
		arguments.appScope.cbBootstrap.onApplicationEnd( arguments.appScope );
	}

	// request start
	public boolean function onRequestStart( string targetPage ){
		// Process ColdBox Request
		application.cbBootstrap.onRequestStart( arguments.targetPage );

		return true;
	}

	public void function onSessionStart(){
		application.cbBootStrap.onSessionStart();
	}

	public void function onSessionEnd( struct sessionScope, struct appScope ){
		arguments.appScope.cbBootStrap.onSessionEnd( argumentCollection=arguments );
	}

	public boolean function onMissingTemplate( template ){
		return application.cbBootstrap.onMissingTemplate( argumentCollection=arguments );
	}
}
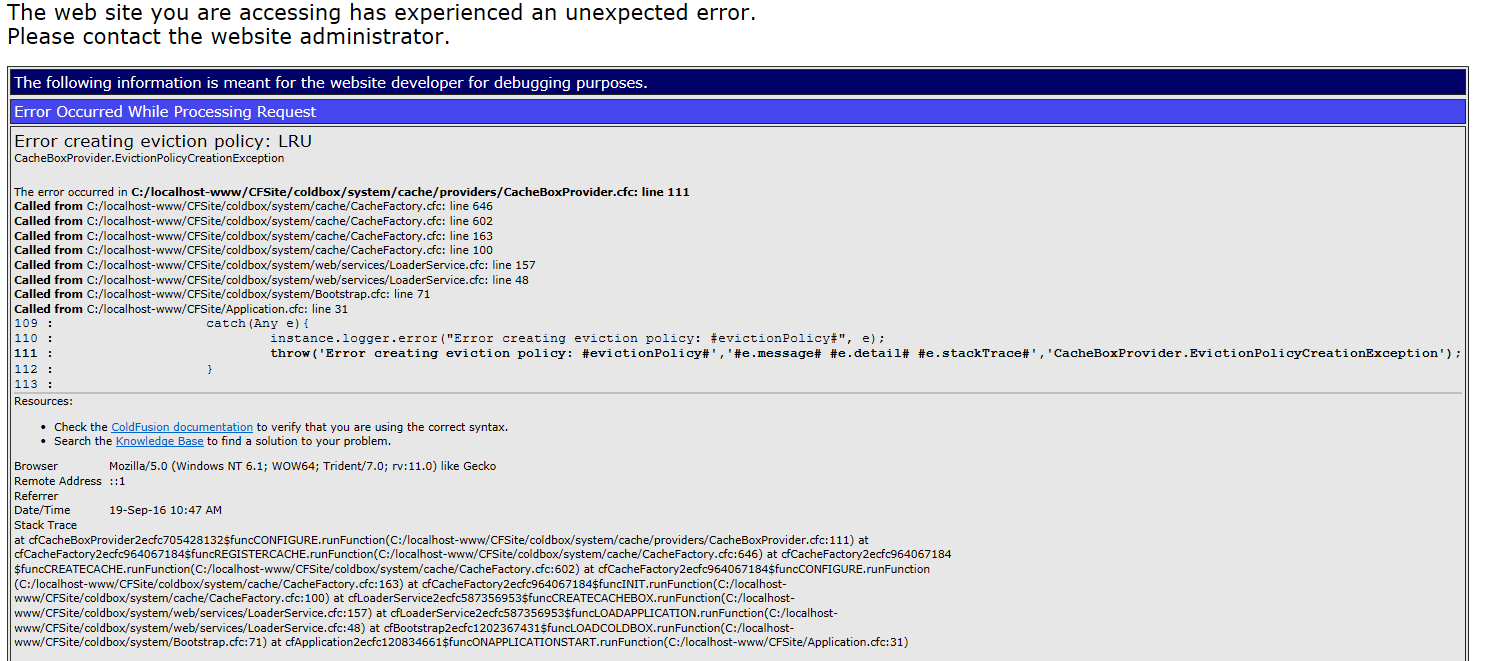
If this update is not made you can expect to encounter an error stating “Could not find the ColdFusion component or interface coldbox.sysm.web.services.BaseService.”

Alternatively you might encounter an error stating “Error creating eviction policy: LRU”. This is due to Coldbox not finding the path to the /coldbox folder and you might need to verify the mappings in the Application file.
Install Java Runtime Environment (JRE)
Java is pretty easy to install. In short, execute the download file, click Next and Agree to the license terms and your done.
Install Eclipse
Eclipse doesn’t actually install since it’s considered a stand-alone application. However, if you didn’t install the Java Runtime Environment (JRE) or the Java Development Kit (JDK) you’ll encounter an error stating it must be installed.
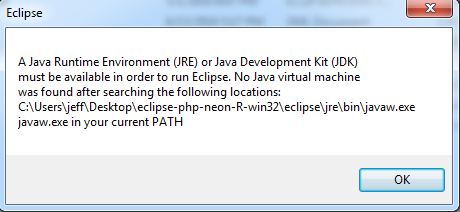
Go back one section if you need a little help installing the Java Runtime Environment (JRE).
- Extract the downloaded compressed file to your Documents Library.
- Right click eclipse.exe at the root of the extract folder and select Create shortcut.
- Rename and copy the shortcut to your desktop. Once there you can double click to start Eclipse
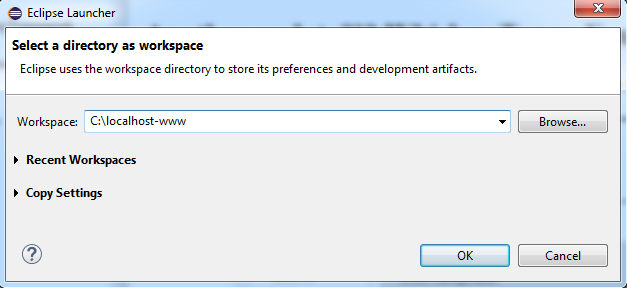
- The first dialog to be displayed is to Select a directory as workspace. It’s here where we’ll specify our ColdBox folder we created above at C:\localhost-www.
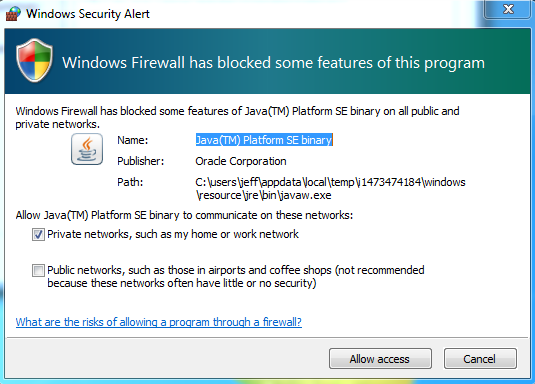
- A Windows Security Alert window will be displayed requesting network access on Private networks, click Allow access.
At this point ColdFusion files will not be viewable yet but after the next step we will.
Install CFEclipse
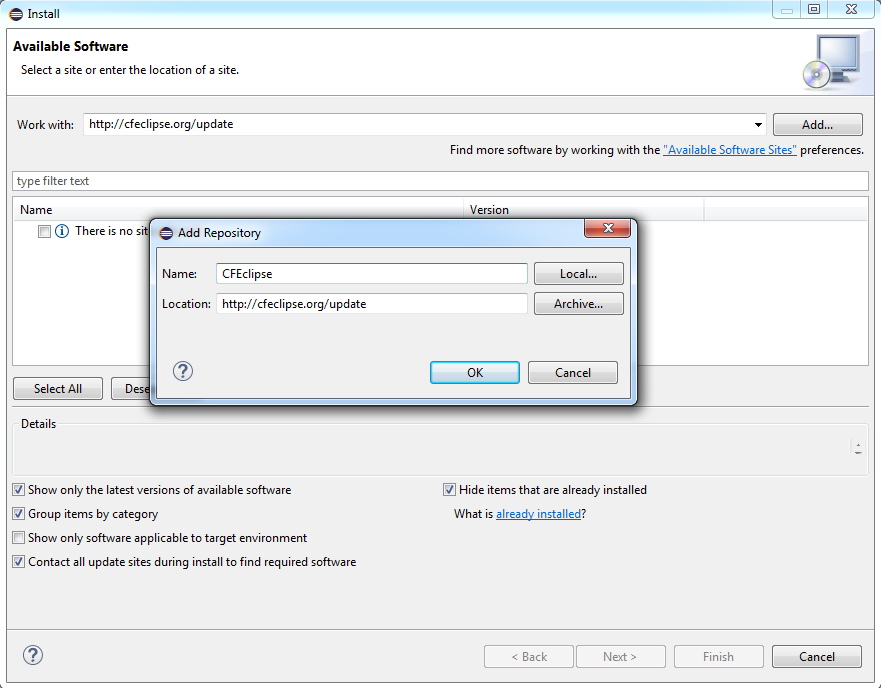
- In Eclipse, click Help > Install New Software…
- For Work with enter http://cfeclipse.org/update and click Add…
- For Add Repository as the Name enter CFEclipse and click OK.
- Now only select the latest version of CFEclipse CFML Editor, usually noted as Required.

- Click Next, accept the terms of the license agreement and click Finish.
- You’ll get an Security Warning stating you’re installing “unsigned content.” This is ok, click OK and continue.
- Check CFEclipse Signing and click OK.
- Restart Eclipse
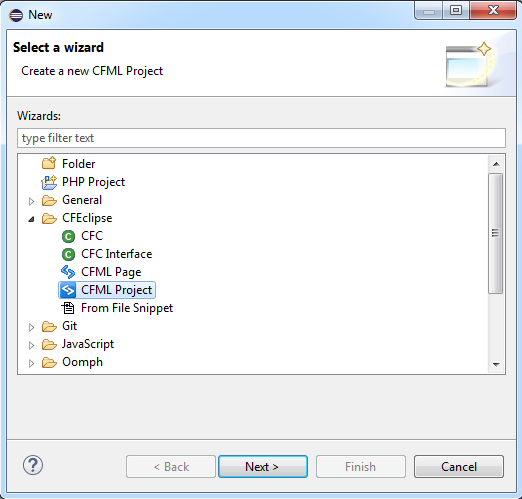
Now we need to create a CFML project
- Click File > New > Other
-
Select CFML Project and click Next.
- Add a Project name of CFSite and use the default location.

- Lastly choose Yes to open the CFEclipse perspective.
